yah Photography

Kim - Flirty, Fun Portrait Session - Fort Mill, SC by Kelli Conley

This week the weather has been gloomy, raining, and then last night it snowed. But somenhow in the midst of all that Kim and I picked a great day to get her pictures taken! It was in the high 60's with gorgeous sun and everything turned out perfect! Then as soon as we finished, Kim zipped off to Zumba class, where she is working to possibly become an instructor. Kudos to her for that, I think that is so awesome and would love to take her class!

Unveiling - Vintage Charging Station by Kelli Conley

After applying three coats of sealing rubber inside, and a couple coats of yellow paint outside, a bit of distressing... and VOILA'!!
When we went to The Depot we were on a quest to create this... but then found this little gem (for those of you who did not see the before pictures).  I am so happy we did, because it turned out better than I imagined!  So now my charging station is all ready to go, rainbow fan and everything!
 
Stay tuned for my next project... a vintage lace camera strap cover!! I've been waiting awhile for this one!!  
 

Discovered - Vintage Salesman's Warming Oven by Kelli Conley

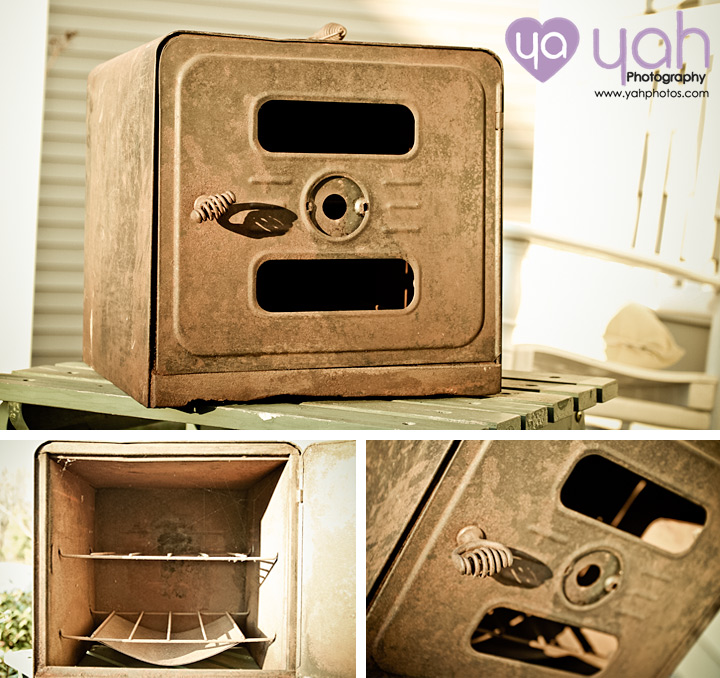
So excited for what we uncovered at The Depot this past weekend! We have tried everything to find out what it is, we know it was from Nesco as it is branded on the back but there is almost nothing about it anywhere on the internet. I found one lead that showed that it was a salesman's warming oven and we know it is not electric; but either way it has become my newest treasure! I can't wait to show you what I'm going to turn it into! Stay tuned for the post production this weekend!! =)


DIY - Vintage Lace Pen Jar by Kelli Conley

This all started with a jar I had lying around the house. I thought, what can I do with this... make it into a pen jar! 
It was super easy and turned out really cute!
Here are all the supplies I used, you can add more and change to your liking:
A smaller size Ball or other glass jar, paper to line the jar, vintage lace to go around the jar, a paper flower, a small square of cardstock, sticker letters, stamp pad, hot glue gun, scissors, paper cutter...
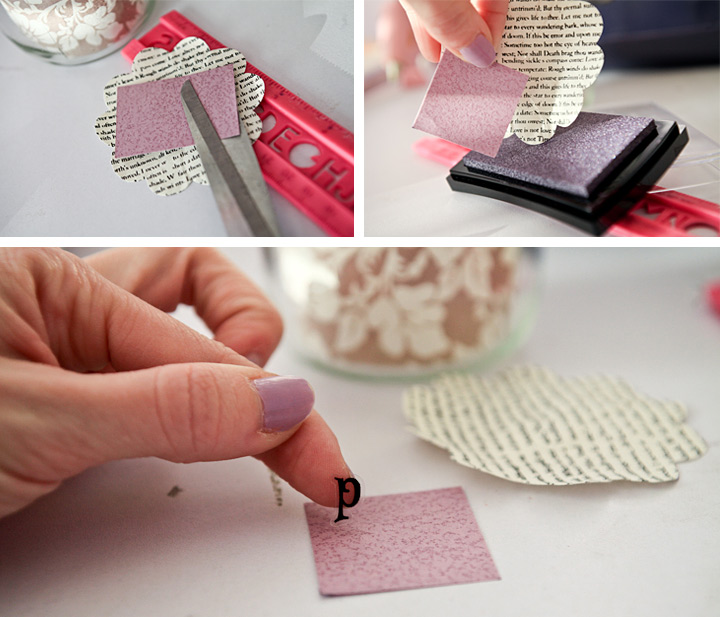
Step One: Measure the inside of the jar, and cut the lining paper to match that height. Once it is cut you can either let the piece wrap within itself inside the jar, or you can trim it to the circumference of the jar.  (I just let mine wrap around the inside of the jar)
Step Two: Wrap the vintage lace around the jar and cut where it touches.
Step Three: Cut your small piece of card stock to match the inside of your paper flower, make sure you make it large enough to fit your sticker letters
Step Four: I like the ink the edges of my paper, it kind of gives it a distressed look.
Step Five: Then work to attach your letters, make sure you watch your spacing... I always lay them lightly to make sure they are aligned before I completely stick them down.
Step Six: Glue down the square card stock you just put the letters on, onto the paper flower
Step Seven: Glue the vintage lace you cut onto the back of the paper flower, make sure both piece touch as that is how you measured it when you cut it. 
Then slip the whole thing over the bottom of the jar and insert pens! This is so customize-able, I just love it! Hope this inspired you to get out and do something crafty!! 
I hope this inspired you to get out and do something crafty!! 
 

THE pod - Review with Photos by Kelli Conley

Pro’s: Lightweight, convenient, steady, portable, easy to attach, and can be used on any surface.  It was so nice to be able to have it handy in my camera bag and be able to pop it out and put it on if I wanted more stability!Con’s: There is white wording on the lens strap (the companies logo), and after a couple times of adjusting it for my different lens’ it started to peel off. Other than that, this thing is awesome! In conclusion, this is a great product, and wonderful to use when a tripod is not an option, like in my scenario, or when you need something fast, portable and easy. I definitely see myself getting the silver one for when I use my zoom lens, and trying out the Cube as I have a battery grip on my camera (I had to take it off in order to use this), and the Cube adapts to support the lens with the battery grip still attached.

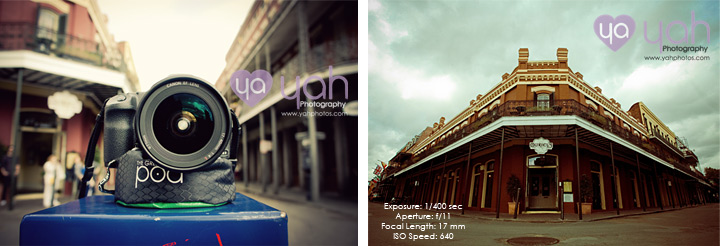
The Story: During our trip to NYC in December I knew that I wanted to get a night shot of the city from the top of a building, and a couple other shots that required a tripod. Once we landed, our first stop was B&H Photo! We went straight to the tripods, found the one we had been looking at online and purchased it. While walking to the register we noticed a display rack for THE pod. My husband had seen it online and had told me about it and we had done a little research on it so we decided to get the green pod and try it out. Well, it was a good thing we did. Later that night, we get to the top of Rockefeller Center and I start to put my tripod up and a security guard tells me that I am not allowed to have a tripod up there. I was so bummed and thought man the rest of the trip is going to stink because I couldn’t use my tripod. But lucky for us, we had grabbed that pod. It made its debut in Grand Central Station, and WOW was it awesome! It is so easy to connect to the camera; you just screw it into the tripod mount and then clip a strap around the lens to keep it in place. Any sort of semi-flat surface will hold the Pod, as it has beans or something similar that stabilizes the camera to hold steady while taking a photograph. I tried out a variety of shutter speed lengths to see just how stable the Pod was, and was impressed by the results. Below are pictures with the camera settings so you can see for yourself...

And here it is on top of the Empire State Building… remember I am 86 stories up and the building sways back and forth; so any sort of zoom lens would show some shake without a tripod, or in my case THE pod =)

Then just this past weekend in New Orleans, I took it everywhere with me and these are the shots I got!


Be sure to check out THE pod on their website, and feel free to pick it up from B&H photo or from one of the other fine retailers where it is sold!